


 484
484 46
46 3
3 11
11 8
8 0
0


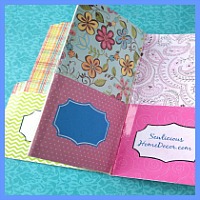
Here’s a fun and quick tutorial for an Easter Egg Zipper Pouch with a Key Holder! This cute little pouch makes a great coin purse or to put your lipstick or change in. It’s easy and quick and can be done in 30 minutes.
This tutorial is for beginners or advanced sewers. If you can sew, you can do this!
I participated in K & C Supplies Free Sewing Supplies for Tutorials Exchange and they supplied the zipper for this tutorial.
You will need a zipper, matching fabric, and the Easter Egg pattern. I used a cookie cutter to cut it out. You can enlarge it or make it smaller as you wish.
You can use a 5″ zipper or 7″. It doesn’t matter how long the zipper is, since you’re going to cut it.
Ribbon for the key holder and a metal key holder.
Cut out two Easter Eggs from both fabrics using the Easter Egg pattern.
Match up one of each easter eggs with one of each fabrics. With wrong sides together, (yes , I said wrong sides together…it will makes sense in a few steps!) Sew together.
You will have 2 Easter Eggs. One side will be one color of fabric, and the other side will be your other color of fabric.
One side will be the wrong side and one side will be the right side.
Take one Easter Egg with the fabric you want facing up (right side) and cut it in half diagonally as shown.
Lay one side facing down (right side down) in the middle of the zipper as shown. Pin in place and sew on to zipper.
Now, line your other piece on the other side of the zipper. Right side down, wrong side facing up.
Make sure it lines up correctly with the other piece so that when you fold it over it will be the shape of an Easter Egg and won’t be off.
Pin and sew in place.
It will look like this after you are done. Right side showing.
Now, pin in place the ribbon where your key holder is going to be on the right side.
The folded part of the ribbon is pinned inside, the raw edge of the ribbon is the part sticking out of the egg.
Unzip the zipper about half way so you can turn it right side out afterwards.
Pin the other Easter Egg on top. Right sides together.
Sew in place. Sew right over the zipper! When you’re done sewing, cut off the access zipper then turn right side out.
You’re all done!
Other tutorials you may enjoy: Easter Bunny Wreath Tutorial
Craft Room Helpers: Scissor Stand
See all my Craft Room Organization Helpers here!

Follow SewLicious Home Decor’s board SEWlicious Sew’en Stuff on Pinterest.
Linked up at Showstoppers, Between Naps on the Porch, and at these great partie

Related Posts
 4844631180


Lindsay says
Hi! Thanks for sharing this tutorial with the world! I just wanted to give you a head’s up that I’ll be linking to it from my blog (http://sewlindsaysew.wordpress.com) in a post about my ten favorite Easter-inspired projects! Happy Sewing!
Thank you, Lindsay! I’m so glad you included it in your roundup! I hope it inspires others to make one!
love this and love that wreath! Great tutorial. I am bad with zippers but I think I can do this!
You can do it! It’s super easy….this is only the second time I’ve sewn a zipper.
that egg pouch is SOOO cute! Love the fabric too! You’ve been featured today at the Create Link Inspire Weekend features over on Nap-Time Creations… {my blogs going through a few changes so ignore the dust ;o)} [email protected]
Thank you, Emily for featuring this! You made my whole day! :
Oh my gosh, the Easter egg pouch is adorable! I need to make one (or five) right now!
haha Thank you, Shelly! They are easy and don’t take long at all! Have fun making them.
This is a beautiful project! I pinned your lovely egg! Thanks for sharing tutorial!
Have a wonderful day and week!
Hugs from Portugal,
Ana Love Craft
http://www.lovecraft2012.blogspot.com
Thank you, Ana! I’m glad you like it and thank you for the pin!! Have a great week.
Love your Easter Egg Pouch and all the other lovely sewing ideas! Thanks for sharing at the party, it was great to have you drop by. I hope you have a nice week. Happy Monday!!
Thank you, Theresa!